Tuesday, December 10, 2013

Werribee River

For me and my friends, it was/is a long time wish to shoot a flowering Canola field, and during this year's spring we decided to make it. As usual, planning started with with Googling for locations around Melbourne. Google image returned some brilliant photos taken in and around Werribee area, and a Canola field with twelve trees on a line got all of our attention. After rigorous search for geo-tags and Google Earth's satellite views, we could almost locate the Canola field of our interest on the map. The next task was to decide the most suitable week of spring during which you could expect the blossoms at their best. It was when we made a small mistake. We discussed in detail on the colours of dresses that could be worn for that yellow and blue (sky) background. Finally, with the help of our weather forecast websites a sunny and clear week-end day was fixed. Unlike the past trip plans, we didn't add any other nearby locations to our travel map as we hoped to stay around that area till the sunset.

As usual, we started our trip with a break within first half an hour at Williamstown. It was to have a BBQ to feed our 'always hungry on trips' friend. We made sure that he was full and reserved the leftovers for him for the rest of the trip. It was noon when we left Williamstown with high expectations.

I was trying to cope with my friend who always drive at the speed limits. When my GPS showed two more minutes to my destination, received a call from that speedy friend and answered by my passenger. On phone he was saying that he could only see the twelve lined-up trees and was asking whether his destination is correct. I said, wait there for another two minutes and if I don't see you then your destination might be wrong. And, I could see my friends car within two minutes and the twelve trees. But not the flowering Canola field. It had already been harvested, most likely a day or two before.

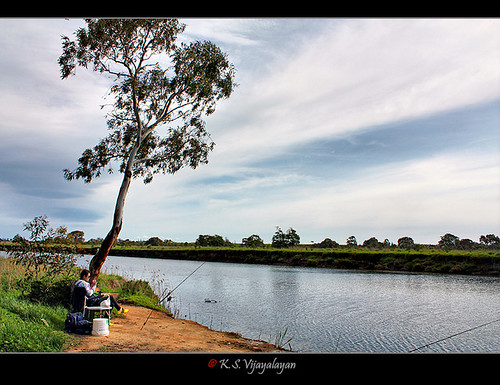
With no other locations left on our travel plan, we decided to drive around nearby rural areas to see whether we still have got any luck to see a Canola field somewhere. All we could see were bare farmlands. Thoroughly disappointed, we stopped our cars on designated parking area along the K road to discuss any alternative plans. It was when we noticed a river flowing along and a look-out area. It was a blessing in disguise and we spent next two hours at the serene bank of Werribbee river.

Werribee

Werribee

Werribee

Werribee

Friday, May 24, 2013

Pre-shoot checklists for an amateur photographer

Though I carry my DSLR with me the most of time, there were instances when I have missed some interesting shots. Or, some of those shots I managed to capture turned out to be unacceptably poor quality ones due to inappropriate settings on my camera. Or, sometimes camera refused to turn on due flat battery. The worst cases were when the whole set of photos taken during an event or tour got spoiled due to some settings that were hardly noticeable on the camera's LCD display, and became apparent only when the images were loaded to a computer. An example was the graininess resulting from a high ISO setting.

After a number of setbacks and the same mistakes found to be repeated, I decided to create a checklist and to keep a copy of it in my camera bag. Here is my latest checklist:

Camera and lenses
  1. Cleanliness of
    • Lenses
    • Camera body
    • Eye-piece / view finder
  2. The right lens attached to the camera (depending on the photoshoot)
  3. Settings or fittings on the lens(es)
    • Auto focus ON
    • Image-stabilization / vibration-reduction ON
    • Appropriate filter(s) attached
    • Lens hood attached
  4. Camera mode 
    • Manual (M) - if the exact settings required (shutter speed, aperture, ISO) could be guessed in advance
    • Program (P) - to take photos instantly without thinking much (especially for outdoor)
  5. ISO setting
    • Auto ISO or ISO with upper bound setting
    • Preferred ISO
  6. Exposure compensation = 0
  7. Focus point
    • Auto / all
    • Centre 
  8. Focus mode
    • AI Servo
    • One-shot
  9. Image output type = RAW
  10. Metering mode = Centre weighted
  11. Drive mode = Single / multi
  12. Battery level
  13. Empty memory card or enough remaining memory space 
Flashes and lighting kits
  1. Main flash
    • Mode = TTL/Manual
    • Flash exposure = 0
    • Battery level
    • Diffusers
    • Master flash setting (if slaves are to be synchronized)
  2. Slave flash
    • Slave mode
    • Trigger settings
    • Brackets/clamp, stand, umbrella/softbox
  3. Reflectors
Camera bag
  1. Extra batteries (all of them fully charged)
  2. Extra memory card(s)
  3. Lenses
  4. Cleaning kit (cloth, blower, brush, liquid)
  5. Wired/wireless shutter release
  6. Lens filters
  7. Weather protection bag
  8. Notebook and a pen
  9. Backup camera (whenever necessary/available)
  10. Torchlight (US flashlight)
Other items
  1. Tripod / Gorillapod / Monopod
  2. Quick release plates
And, the last but not the least, take few test shots!

On a side note, I keep plentiful of rechargeable batteries. Upon charging batteries, I put them in cases to indicate that they are the fully charged ones. Once taken off the cases, I use the batteries until they loose their last drop of juice to reduce the number of recharging cycles batteries go through for their prolonged life. The exceptions are the critical photoshoots for which I load with fully charged batteries in all my equipment, and the removed ones will go through a recharging cycle. 

Disclaimer: This checklist may not be complete. Inputs are welcome to make it better.


Related posts:

Saturday, April 20, 2013

Venue arrangement for good photos - Dos and Don'ts

Front view


Chosing the backdrop (or the wall behind)
Dos
  • Chose backdrop colour that provides a decent level of contrast - not too much and not too low, and matches with the theme - if any.
  • Backdrop large enough to cover the background (i.e, large enough for group-photos, and goes well behind the intended decorations)
Don'ts
  • Avoid colours that dominate or too-eye-catchy
  • Avoid reflective/shiny backdrop
  • Avoid folded clothes if you have got other decorations in the background

Head table (if any)
Dos
  • Chose a table of moderate size 
  • Keep enough space in front of the table for the photographer to cover the event
  • Maintain a good level of symmetricity 
Donts
  • Avoid clutter with too many things on the table
  • Avoid head table locations with view blockers (guest tables, pillars in front, beams above, etc), in a dark corner, or near places where lots of people might gather for other purposes (e.g. food table, children's play area)
Plan view

Decorations
Dos
  • Maintain symmetricty, colour balance, and the theme (if any)
  • Place decorative items beside the head table in right places (not too far away from the table, or too close to block views or hide behind the people
 Donts
  • Avoid blocking views with decorations

Guest tables arrangement
Dos
  • Leave space for the photographer (not within or close to the triangle marked in Pic. 2)
  • Maintain some level of symmetricity 


Other tips
1. Decide the shots you would like to have in advance and discuss with the photographer
2. Give ample time for the photographer and corporate with him/her
3. Show the venue in advance to the photographer (e.g., by sending few photos of the location taken with a camera phone)
4. Take photos well before getting tired. It is better to take family photos before the function starts.